How CSV data intake works
Information
This tutorial applies to intakes of Landing Zone type and is an illustrative guide. There may be minor frequent changes to the code in the scripts. Use these scripts as starters to build your own. The scripts were tested on Sidra 2023.12 (2.0.3). For more information, you may contact our Sidra's Support Team.
In this tutorial we illustrate how to configure a Sidra Entity to ingest data from CSV files into the platform.
Introduction
For a data intake process to take place, Sidra needs the metadata - definitions for each Entity and the Attributes - corresponding to the CSV table with its columns.
As opposed to database Providers, there is no automatic metadata inference pipeline available. This means that one needs to manually specify this metadata, for each of the Entities (tables) that should be ingested, as well as their Attributes (columns).
Defining the metadata, as an overview, refers to:
- Ensure we have a Provider for the various CSV files to be ingested.
- Define an Entity for each type of CSV to be ingested.
- For each Entity (type of CSV), define the Attributes corresponding to the columns/fields present in that CSV.
- Note that there are also some system-required Attributes, needed for specifying how to read and process the columns/fields in Databricks tables.
- Associate the Entity with the ingestion Pipeline for data files.
Declaring the metadata can be carried out by either calling the Sidra API, or executing a SQL script directly on the Sidra Service metadata database. The PowerShell script sample below is calling the Sidra API and can be used to start defining CSV-ingesting Entities.
It is recommended to declare the metadata for the Entities (CSVs) to be ingested using the Sidra Service API calls. The API is performing additional validations. By contrast, adding the metadata with a SQL script does not ensure input validation. The Transact-SQL snippets in this article are only shown as illustration.
Defining the metadata
Information
Sidra metadata tables do not allow for space characters in the names of Attributes or Entities. The metadata API will sanitize spaces in characters if they are provided in Entity or Attribute names, by replacing with `_` character. Such sanitation is only done by the API; the SQL scripts will not do it.
There are rules on configuring the metadata. The sample scripts in this article - for PowerShell-based API calls - may be used, but you should be aware of the restrictions, limitations, and settings affecting the ingestion.
Defining the Provider
The Provider should be regarded as the data source, like the database or the system generating the CSV files. The main fields for a Provider definition:
- The
[ProviderName]is the human-friendly identifier, no longer than 30 chars. Keep in mind that this field only takes unique values; can't have 2 Providers having the same name. - The
[DatabaseName]will identify the target Databricks destination DB and the Azure Storage container for Assets. Hence, observe the naming limitations as per Azure's documentation. - The DSU identifier or the Azure DSU Resource Group where data is ingested to Databricks. Most Sidra deployments would use only 1 DSU. The DSU records are stored in the Core DB in
[DataIngestion].[DataStorageUnit]table.
The Provider table definition may help, for details.
Defining the Entity
It helps thinking of the Entity as being a database table; each Entity will have a Databricks table associated. Metadata about the Entity tells how the data is to be ingested in the table. Things to observe:
- The
[TableName]field of the Entity will be used to identify the Databricks table; hence, restrictions apply.
Most notably, the space ' ' character must not be used. In fact, the Java libraries in Databricks will reject table names containing" ,;{}()\n\t". - The
[RegularExpression]acts like a filter and mapper. Only CSV files with names matching the RegEx will be associated to this Entity and its Pipeline. CSV files not matching any Entity RegEx will be rejected as noise artifacts.
Rejections will be logged as errors in the[Log].[Util].[Log]database table. - The
[StartValidDate]and[EndValidDate]are also filters. CSV blobs that don't fall in the interval will not be ingested.
The Asset date, which is considered for the interval, is deducted from the CSV blob name or path:- either its path should contain
/<year>/<month>/<date>/segments; - or its file name should indicate the date, and the RegEx matching should be built to extract these (see example below).
- either its path should contain
- Mind the
[FieldDelimiter](from version 2022.R3 being part of theAdditionalPropertiesJSON in thereaderOptionsfield): although CSV denotes Comma-Separated Values, the delimiter may also be TAB\t, pipe|, ampersand&, circumflex^, or others.
Place the UTF-8 representation of the delimiter in this field, like\u0009for TAB,\u002Cfor comma, or others.
Since release 2022.R3 (1.13.0), the [FieldDelimiter], [HeaderLines], [Encoding], and [RowDelimiter] are disregarded by the new ingestion module. A readerOptions object can be passed in the [AdditionalProperties] field of the Entity; it will configure how the CSV file is being parsed by the Spark library.
The Entity table definition may help, for details.
Defining the Attributes
Just like an Entity describes a table, the Attributes are describing the table columns, or the record fields. A few things to observe:
- Don't use the space ' ' character in the
[Name]. The Java libraries in Databricks will reject table names containing" ,;{}()\n\t". - The
[HiveType]and[SqlType]describe what kind of data the column has, and how it should be treated by Databricks or any SQL DB used in Data Products. - With CSV ingestion, there are some 5 system-required Attributes, used in Data Lake. These are created by the sample scripts below. They should be the last in relation to the
[Order]field of the Attributes.- The
SidraIsDeletedAttribute; - The
SidraPassedValidationAttribute; - The
SidraLoadDateAttribute; - The
SidraIdAssetAttribute; - The
SidraFileDateAttribute.
- The
- One of the columns in the CSV should be a Primary Key, if records are planned to be updated with CSV ingestions for the Entity. Its corresponding Attribute should have
[IsPrimaryKey]set to 1.
The Attribute table definition may help, for details.
Pipeline and Stage landing
The defined Entity should be processed by the FileIngestionDatabricks Pipeline; so, a mapping record should exist in the [DataIngestion].[EntityPipeline] table. This pipeline will be responsible for:
- Registering a new Asset for each new CSV file to be ingested for the Entity. Once registered, the Asset's CSV blob is moved under a Stage container with the name of the Provider.
- Creating (or re-creating) the target Databricks table where records would be ingested, if that table does not exist.
- Running the DSU ingestion script to bring data from the registered Asset (CSV blob) into the Databricks Entity's table.
The CSV files should be dropped under the landing container of the DSU Stage Azure Storage Account - the account containing stage in its name. Additionally:
- These file blobs should be placed under a folder named like
/<provider-name>/<entity-name>/; - The file names should match the
[RegularExpression]set for the Entity; - The full name of the resulting blob should indicate the Asset date:
- either its path should contain
/<year>/<month>/<date>/segments after/<provider-name>/<entity-name>/; - or its file name should indicate the date, and the RegEx matching should be built to extract these (see example below).
- either its path should contain
If everything is correct, the above Pipeline would pick the landed CSV blob and start processing it, resulting in a Data Factory pipeline run. At the end of the Pipeline run, the records from the CSV file will be visible in the Entity's Databricks table.
Step-by-step
The sample scripts below illustrate the overall process needed: adding a new Provider, adding a new Entity, adding new Attributes, associating the Entity with a pipeline, and checking Assets metadata.
Configuration through API calls
The following calls to the Sidra Service API can be performed through Swagger or PowerShell, to declare the metadata as per above instructions:
- Endpoint
/api/metadata/providers: used to create the Provider. - Endpoint
/api/metadata/entities: used to create the Entities. - Endpoint
/api/metadata/attributes: used to create the Attributes associated to an Entity. - Endpoint
/api/metadata/entities/{idEntity}/pipelines/{idPipeline}: used to associate an Entity with a pipeline.
Helper PowerShell script
To help automate defining the metadata, you can use the following PowerShell script template and its associated input file:
- The Define-CSV-entity.ps1 is calling the Sidra Service API, based on the information passed to it.
- The Define-CSV-entity.psd1 should be populated with the needed info and then passed as
-ParamsFileparameter to the above script.
Because the parameters needed by the script are complex, these parameters may be populated in a PowerShell-specific PSD1 file. The sample above has the needed structure for passing:
- Information about how to call the Sidra Service API: endpoints and obtaining the OAuth authorization token.
- Required metadata for Provider, the CSV Entity and the Attributes pertaining to CSV columns.
Usage example:
PS D:\Sidra.SupportTools> .\Metadata\Define-CSV-entity\Define-CSV-entity.ps1 `
    -ParamsFile "D:\Temp\Define-CSV-entity_Bikes.PSD1" `
    ;
Behavior:
The DSU with its implicit Data Factory entry will be selectable at runtime, if multiple of these are present within the Sidra installation.
The Provider and Entity records are upserted:
- If they don't exist in the
[Core]DB, they are created; - If they're already present in the
[Core]DB, they're updated.
If an Attribute collection already exists for an (already existing) Entity in the [Core] DB, the collection may be:
- Re-created from scratch - all
Attributerecords are deleted and then re-created; or - Updated - each
Attributein the input is upserted in the existing collection. The corresponding option will be selectable at runtime, if applicable.
Sample load from a CSV file
Once the file metadata has been configured, we can execute a test load. It will be required to perform the following steps:
1. Rename the CSV file
- The name needs to follow the regular expression.
- The name of the file also needs to specify Asset Date.
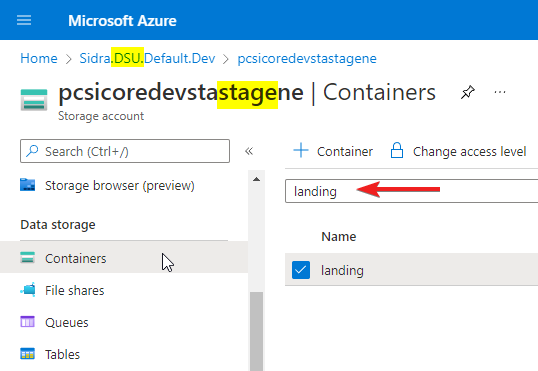
2. Deposit the file in the landing zone
- The landing zone is in the DSU Resource Group, in the Storage Account with the name that contains
stage. - Inside this account there is a container with the name
landing...
- It is highly recommended to upload the file to a path that contains the Provider and the Entity of the file, like:
/<name_provider>/<name_entity>/<file>.csv
/<name_provider>/<name_entity>/<year>/<month>/<day>/<file>.csv
If the metadata and file configuration have been the correct ones:
- Sidra will start automatically to load the file in the DSU.
- In Databricks, there will be a table with the name of the Provider and Entity.
- This table will contain the CSV information in delta format.
- The data will be stored in Databricks in an incremental way: each new CSV file that corresponds to this Entity will append new records to the corresponding table in Databricks.
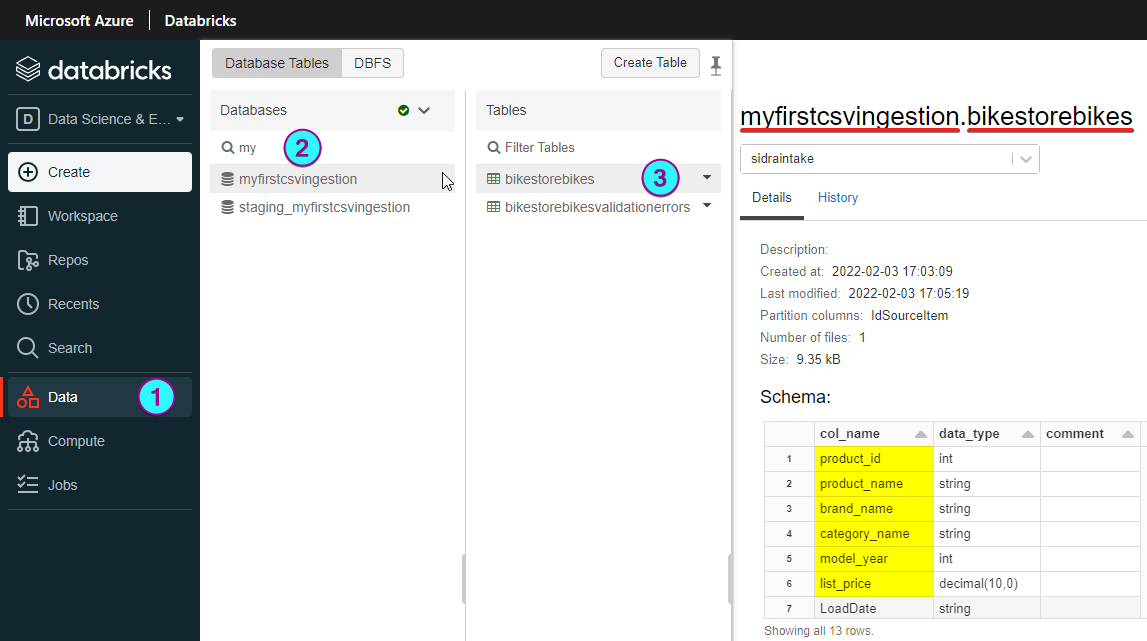
Example
Here we can see an example of what could be visualized in Databricks after loading two CSV files corresponding to the configured same Entity:
- Provider:
MyFirstCsvIngestion. - Entity:
BikeStoreBikes. - You may download for a test.
- Databricks table: